Using Nullmailer and Mandrill for your Ubuntu Linux server outboud mail

Getting a good SMTP server for your small business web application is difficult. You usually rely on the your local VPS server provider having some kind of SMTP server in local network. Because email handling might not be part of the core competence of your hosting provider, the provided service, if there is any, is usually ridden with problems. An alternative is buying a premium SMTP server, but pricing plans do not always meet the provided documentation, features and API support.

This all can change today. Meet Mandrill. Mandrill is outgoing email service provided by Mailchimp email newsletter service – so they have all the money, skill and interest keep their SMTP server working and spam blacklist free. This blog posts discuss how to use Mandrill as Nullmailer backend, so that your server can send easily email through Mandrill SMTP.

1. Benefits of Mandrill

Mandrill is

  • Real SMTP server with SMTP and HTTP APIs
  • 12k free emails per month – very generous from them
  • The owner has clear interest keeping it spam blacklist free (Mailchimp, their main product, is a newsletter service)
  • The web admin interface is easy and powerful
  • Mandrill supports converting all links in emails automatically trackable

Sidenote: when dealing with setting From: address in email make sure the domain records of the from email address whitelist the outgoing email server IP addresses via SPF records

2. Benefits of Nullmailer

Nullmailer provides sendmail compatible email out interface on your server.

You want to use Nullmailer because

  • Super easy to set-up
  • Provides local queue
  • Lean, unlike heavy-weight Linux mail relay solutions (Exim 4, Postfix, Sendmail)

Note: Nullmailer does not provide local SMTP server listening to port 25. I’ll blog about how to deal with this later.

3. Setting up Nullmailer + Mandrill for Ubuntu 12.04 LTS

Nullmailer is a mail command emulator, as discussed before. A lot of old fashioned web applications, like ones written in PHP, don’t have good options to set outgoing email server directly. Thus, you need to setup your local server to be a Mandrill mail slave. As a bonus, your mail UNIX command starts working also, getting support for Cron etc.

4. Install Nullmailer

You want to have your email traffic to be SSL encrypted. Nullmailer supports this since version 1.10 . Ubuntu 12.04 ships with Nullmailer 1.05-1. To get the latest Nullmailer for Ubuntu do from my Ubuntu PPA (see prior blog post about how I backported Nullmailer to Ubuntu 12.04)

Note: This will remove existing mail solutions on the server.

sudo apt-add-repository ppa:mikko-red-innovation/ppa
sudo apt-get update
sudo apt-get install nullmailer=1:1.11-2~precise1~ppa1

(Read more about my Nullmailer backporting effort).

5. Setup email relaying and information

Setup Mandrill upstream SMTP in /etc/nullmailer/remotes:

sudo echo "smtp.mandrillapp.com smtp --port=587 --starttls --user=xxx@example.com --pass=ccc" > /etc/nullmailer/remotes"

Setup domain info:

sudo echo example.com > /etc/nullmailer/defaultdomain
sudo echo "\$hostname.example.com" > /etc/nullmailer/me

Add yourself as an admin of outgoing mail:

sudo echo "mikko@example.com" > /etc/nullmailer/adminaddr

Make Nullmailer to read new configs

service nullmailer reload

6. Testing Nullmailer

Below is the command line to send some mail to yourself:

echo "This is a test message from ${USER}@${HOSTNAME} at $(date)" \
  | sendmail mikko@example.com

You can see Nullmailer log:

tail -f /var/log/mail.log /var/log/mail.err
Mar 20 16:30:45 koskela nullmailer[17645]: Trigger pulled.
Mar 20 16:30:45 koskela nullmailer[17645]: Rescanning queue.
Mar 20 16:30:45 koskela nullmailer[17645]: Starting delivery: protocol: smtp host: smtp.mandrillapp.com file: 1363793445.17667
Mar 20 16:30:45 koskela nullmailer[17645]: Starting delivery, 1 message(s) in queue.
Mar 20 16:30:46 koskela nullmailer[17668]: smtp: Succeeded: 250 2.0.0 Ok: queued as 4A66419E03C
Mar 20 16:30:46 koskela nullmailer[17645]: Sent file.
Mar 20 16:30:46 koskela nullmailer[17645]: Delivery complete, 0 message(s) remain.

You also also check the server local mail queue

mailq

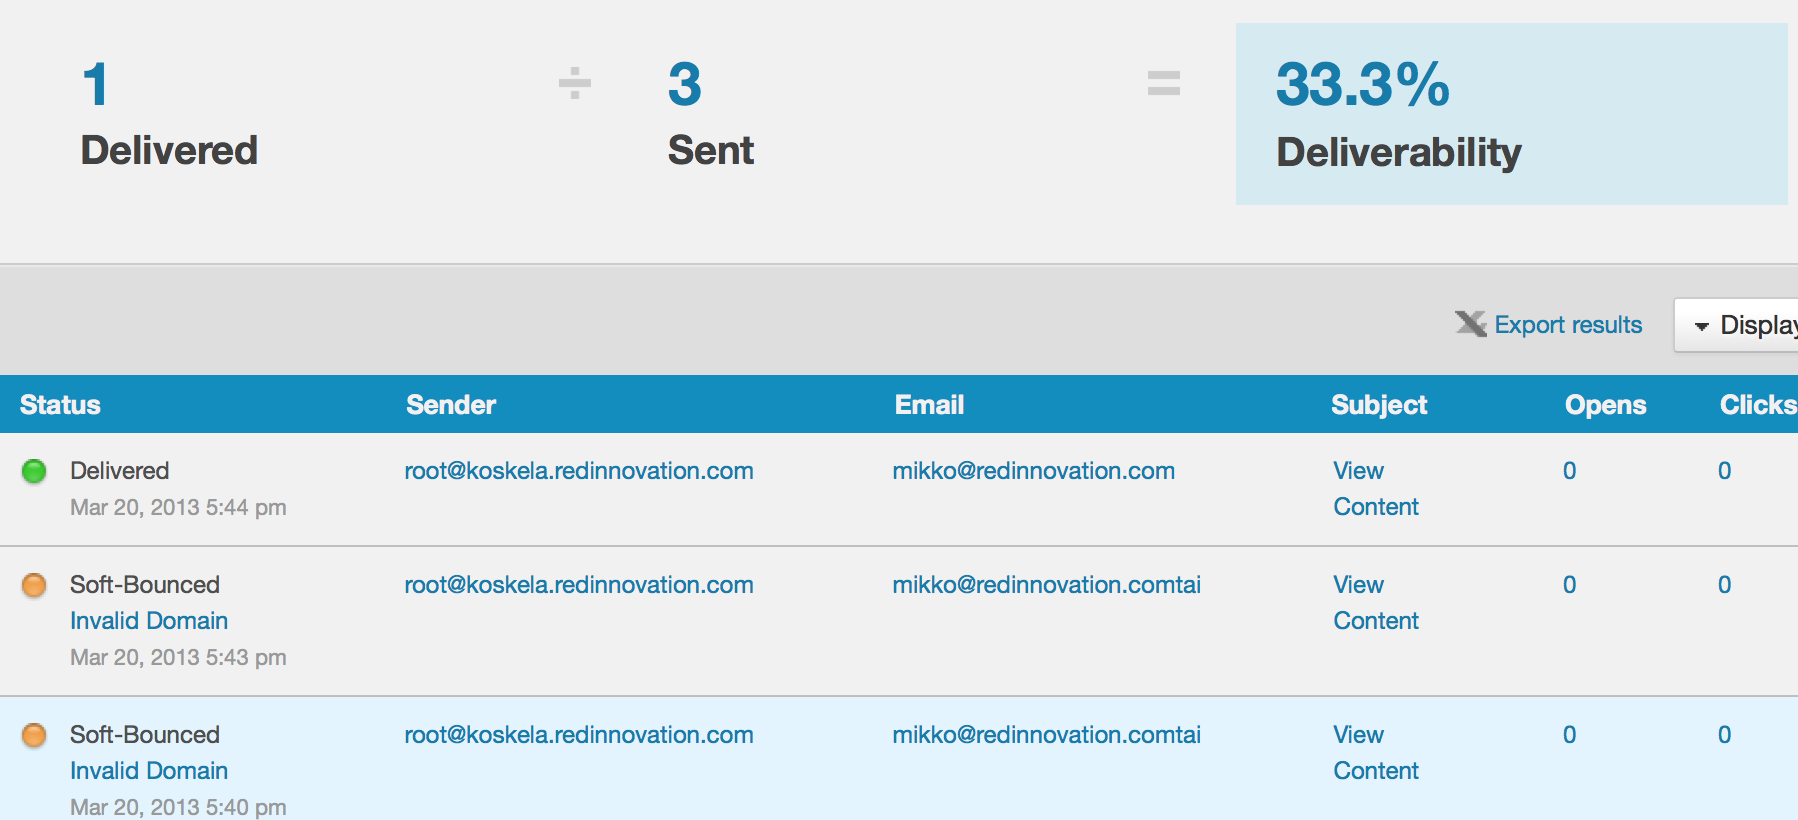
Mandrill itself provides very, very, nice activity dashboard for monitoring error situations

Screen Shot 2013-03-20 at 5.51.14 PM


\"\" Subscribe to RSS feed Follow me on Twitter Follow me on Facebook Follow me Google+

How to backport packages on Ubuntu Linux

Backporting is a process to get new package releases to run on non-latest Linux distribution versions. A very common backporting use case is to enable the latest version of application or software library on a server running the older version of the operating system.

Ubuntu has a default backports repository where community maintained backports go. However if you do not find the package you are looking for there creating your own backported package is easy.

1. Rationale for doing backports

Old stuff is old

I did not know how relative pain free it was backporting packages on Ubuntu. This clearly increases my preference for doing backports instead of hand crafted software builds when putting together my software stack.

For backports:

  • They integrate well with the OS package manager – you can update and uninstall backported packages with the package manager.
  • Ubuntu has one-liner command which will do the backporting for you after you have registered in launchpad.net community. It’s even less effort than make install.
  • Backports come with distribution specific patches, start-up files and file locations.
  • Common good windfall will follow as others can use the package you have backported.

I wrote this blog post as notes when I did my first backport for nullmailer which is a lightweight SMTP slave and mail command backend. Ubuntu 12.04 LTS ships with nullmailer version 1.05 and support for SSL servers was added in version 1.10. (For more context please ee my previous blog post of how I have been using nullmailer with Gmail).

Note that in this blog post I only consider backports which compile as is. If the package needs source code changes then your road will be more bumpy.

2. Starting backporting process

Launchpad is the infrastructure tool orchestrating Ubuntus together. First register an account at launchpad.net. Then, on your personal page Click Create new PPA on your launchpad.net account page. PPA archive is the online repository where the resulting backported package will be placed.

Login to the box running the old target release of Ubuntu (12.04 Server LTS in my case).

Install Ubuntu development tools ubuntu-dev-tools package which comes with various automatication scripts, including backporttool. Note: hefty 100 MB with dependencies.

sudo apt-get install ubuntu-dev-tools gnupg-agent

3. Creating a PGP key using GNUPG in terminal

Launchpad infrastructure uses PGP / GNUPG keys for signing releases. Unfortunately I am not running Ubuntu on my desktop computer, so I couldn’t use easy desktop tools to work with PGP. Instead, I had to work within a terminal in ssh session to a Ubuntu server.

First create a PGP key, unless you have one already, to be used to sign the package releases on launchpad.net. You can do this in terminal on the server. I protected my key with a passphrase which I stored in KeePassX archive in Dropbox:

# Note: The RNG trick here is needed when doing
# thison the server because key generation
# needs entropy and Ubuntu server does not have rng
# daemon enable by default 

apt-get install rng-tools
gpg --gen-key # Use defaults
# Wait until gpg command asks for "more entropy"
# Press CTRL+Z
bg # Leave gpg on background
sudo rngd -r /dev/urandom

# GPG reports its done
# Interrupt rngd with CTRL+C

# A lot of files gets generated in ~/.gnupg folder

# Start GPG agent, so it will be asking the passpharse only once
eval $(gpg-agent --daemon)

# Get your key id (looks like ABC1234)
gpg --fingerprint

# Make backportpackage command to use your key
echo DEBSIGN_KEYID=AEA22323 >> ~/.devscripts

# Register your key with Ubuntu key server 
gpg --send-keys --keyserver keyserver.ubuntu.com AEA22323

Now, go to your launchpad.net account and Edit PGP keys section. In Import an OpenPGP key give they key fingerprint as printed above by gpg –fingerprint. launchpad.net will send you a confirmation email with content like below:

-----BEGIN PGP MESSAGE-----
Version: GnuPG v1.4.10 (GNU/Linux)

hQEMAyYFaWv6mn/LAQf/cRHso6ps1yArBFGW5Z29/xmPwf70mRdzkLtKQdfVBuQh
* snip *
QgxREGLU/Gi4kGRaHF/KmG7d0kPmVUNZk9OLD/jwQUXQtXQWPvRthyI=
=+Syx
-----END PGP MESSAGE-----

In Terminal, which is still running your GPG agent, run the command:

gpg -d

Paste in the message, including — — lines. You will be asked your key passphrase. Press CTRL+D to terminate the input. Now the secret confirmation link is printed to your terminal:

...
Please go here to finish adding the key to your Launchpad account:

    https://launchpad.net/token/xyz

4. Running backportpackage command

Now you can run backportpackage command. It is fully automated tool to create a backport .deb archive for any existing Ubuntu package. Below I run the command for nullmailer package.

# Set your personal details (go into the package)
export DEBFULLNAME="Mikko Ohtamaa"
export DEBEMAIL="mikko@opensourcehacker.com"
export UBUMAIL="mikko@opensourcehacker.com" 

# Backport my package please!
# PPA was created in launchpad.net web interface beforehand
backportpackage -u ppa:mikko-red-innovation/ppa nullmailer

backportpackage will

  • download the latest version of the package from Ubuntu archives. The latest version must exist in the some newer Ubuntu releases – backporting process does not consider upstream releases
  • attempts to build it
  • uploads the resulting .deb to your personal PPA archive on launchpad.net

In the end here is the sign of the success:

Uploading nullmailer_1.11-2~precise1~ppa1_source.changes: done.
Successfully uploaded packages.

If you are doing this for the first time it will take some time (under ~30 minutes in my case) to get your package accepted in your PPA. You’ll get an automatic notification email when it happens. If it doesn’t happen see the troubleshooting links below.

5. Using and testing your backported package

After you have backported the package successful it is good to go for other your servers as is. You can install the package on the same server you did the backporting or some another server (of same Ubuntu version).

Register your own PPA as the package source for your server:

sudo apt-add-repository ppa:mikko-red-innovation/ppa
apt-get update

Check that your own package with a custom version become available:

apt-cache show nullmailer

Package: nullmailer
Priority: extra
Version: 1:1.11-2~precise1~ppa1
...

Package: nullmailer
Version: 1:1.05-1
....

Install the package you just backported with a specific version string

apt-get install nullmailer=1:1.11-2~precise1~ppa1

… and your server now has the latest version.

6. More information

Information bits needed to pull this together


\"\" Subscribe to RSS feed Follow me on Twitter Follow me on Facebook Follow me Google+

Ultimate Python colorized logger: Somewhere over the rainbow

To make logging based debugging and diagnostics more fun, I created the following enhanced Python logging solution. It colorizes and adjusts logging output so that one can work more efficiently with long log transcripts in a local terminal. It’s based on logutils package by Vinay Sajip.

Screen Shot 2013-03-14 at 6.04.36 AM

What it does

  • Targets debugging and diagnostics use cases, not log file writing use cases
  • Detects if you are running a real terminal or logging to a file stream
  • Set ups a custom log handler which colorizes parts of the messages differently
  • Works on UNIX or Windows

Example of a longer terminal logging transcript which does a lot of output in logging.DEBUG level:

Screen Shot 2013-03-14 at 6.10.39 AM

The source code and usage examples below.

1. Further ideas

How to make your life even more easier in Python logging

  • Make this to a proper package or merge with logutils
  • Use terminal info to indent message lines properly, so that 2+ lines indent themselves below the starting line and don’t break the column structure (how to get terminal width in Python?)
  • Make Python logging to store full qualified name to the function, instead of just module/func pair which is useless in bigger projects
  • Make tracebacks clickable in iTerm 2. iTerm 2 link click handler has regex support, but does not know about Python tracebacks and would need patch in iTerm 2

Please post your own ideas 🙂

2. The code

Source code (also on Gist) – for source code colored version see the original blog post:

# -*- coding: utf-8 -*-
"""

    Python logging tuned to extreme.

"""

__author__ = "Mikko Ohtamaa <mikko@opensourcehacker.com>"
__license__ = "MIT"

import logging

from logutils.colorize import ColorizingStreamHandler

class RainbowLoggingHandler(ColorizingStreamHandler):
    """ A colorful logging handler optimized for terminal debugging aestetichs.

    - Designed for diagnosis and debug mode output - not for disk logs

    - Highlight the content of logging message in more readable manner

    - Show function and line, so you can trace where your logging messages
      are coming from

    - Keep timestamp compact

    - Extra module/function output for traceability

    The class provide few options as member variables you
    would might want to customize after instiating the handler.
    """

    # Define color for message payload
    level_map = {
        logging.DEBUG: (None, 'cyan', False),
        logging.INFO: (None, 'white', False),
        logging.WARNING: (None, 'yellow', True),
        logging.ERROR: (None, 'red', True),
        logging.CRITICAL: ('red', 'white', True),
    }

    date_format = "%H:%m:%S"

    #: How many characters reserve to function name logging
    who_padding = 22

    #: Show logger name
    show_name = True

    def get_color(self, fg=None, bg=None, bold=False):
        """
        Construct a terminal color code

        :param fg: Symbolic name of foreground color

        :param bg: Symbolic name of background color

        :param bold: Brightness bit
        """
        params = []
        if bg in self.color_map:
            params.append(str(self.color_map[bg] + 40))
        if fg in self.color_map:
            params.append(str(self.color_map[fg] + 30))
        if bold:
            params.append('1')

        color_code = ''.join((self.csi, ';'.join(params), 'm'))

        return color_code

    def colorize(self, record):
        """
        Get a special format string with ASCII color codes.
        """

        # Dynamic message color based on logging level
        if record.levelno in self.level_map:
            fg, bg, bold = self.level_map[record.levelno]
        else:
            # Defaults
            bg = None
            fg = "white"
            bold = False

        # Magician's hat
        # https://www.youtube.com/watch?v=1HRa4X07jdE
        template = [
            "[",
            self.get_color("black", None, True),
            "%(asctime)s",
            self.reset,
            "] ",
            self.get_color("white", None, True) if self.show_name else "",
            "%(name)s " if self.show_name else "",
            "%(padded_who)s",
            self.reset,
            " ",
            self.get_color(bg, fg, bold),
            "%(message)s",
            self.reset,
        ]

        format = "".join(template)

        who = [self.get_color("green"),
               getattr(record, "funcName", ""),
               "()",
               self.get_color("black", None, True),
               ":",
               self.get_color("cyan"),
               str(getattr(record, "lineno", 0))]

        who = "".join(who)

        # We need to calculate padding length manualy
        # as color codes mess up string length based calcs
        unformatted_who = getattr(record, "funcName", "") + "()" + \
            ":" + str(getattr(record, "lineno", 0))

        if len(unformatted_who) < self.who_padding:
            spaces = " " * (self.who_padding - len(unformatted_who))
        else:
            spaces = ""

        record.padded_who = who + spaces

        formatter = logging.Formatter(format, self.date_format)
        self.colorize_traceback(formatter, record)
        output = formatter.format(record)
        # Clean cache so the color codes of traceback don't leak to other formatters
        record.ext_text = None
        return output

    def colorize_traceback(self, formatter, record):
        """
        Turn traceback text to red.
        """
        if record.exc_info:
            # Cache the traceback text to avoid converting it multiple times
            # (it's constant anyway)
            record.exc_text = "".join([
                self.get_color("red"),
                formatter.formatException(record.exc_info),
                self.reset,
            ])

    def format(self, record):
        """
        Formats a record for output.

        Takes a custom formatting path on a terminal.
        """
        if self.is_tty:
            message = self.colorize(record)
        else:
            message = logging.StreamHandler.format(self, record)

        return message

if __name__ == "__main__":
    # Run test output on stdout
    import sys

    root_logger = logging.getLogger()
    root_logger.setLevel(logging.DEBUG)

    handler = RainbowLoggingHandler(sys.stdout)
    formatter = logging.Formatter("%(asctime)s - %(name)s - %(levelname)s - %(message)s")
    handler.setFormatter(formatter)
    root_logger.addHandler(handler)
    logger = logging.getLogger("test")

    def test_func():
        logger.debug("debug msg")
        logger.info("info msg")
        logger.warn("warn msg")

    def test_func_2():
        logger.error("error msg")
        logger.critical("critical msg")

        try:
            raise RuntimeError("Opa!")
        except Exception as e:
            logger.exception(e)

    test_func()
    test_func_2()

\"\" Subscribe to RSS feed Follow me on Twitter Follow me on Facebook Follow me Google+